Recently you might have noticed that more developers are using Gatsby JS for building their websites. This article will give a simple introduction to the framework and we will build a simple website that gives country and state details.
What is Gatsby JS?
Gatsby JS is a framework that uses React, and GraphQL to build static websites.
What is a static website? A website that does not change dynamically based on actions. Example: Blogs, Marketing sites, News sites.
Note: This tutorial is meant for those who have a good understanding of both ReactJS and GraphQL ( check my article for a simple introduction to GraphQL ).
Basic concept:
To put it simply in a static site the pages are precompiled.
- Gatsby uses react for designing styled components.
- GraphQL is used for fetching data from a data source.
Let’s get started with coding and we will explore the features of Gatsby.
Sample Application:
In this section, we will build a simple web application that lists countries and their states on a dedicated page.
Before getting started we have to install Gatsby-CLI for developing and building the Gatsby application.
npm install -g gatsby-cliafter the above command’s execution, check the Gatsby version for confirming that we have installed Gatsby-CLI successfully
gatsby --versionFolder structure:

- The src folder contains our project code.
- the pages folder contains all the pages in our project ( 404.js and index.js are available out of the box ).
- the templates folder contains template files, based on which we generate files ( We will see about this in detail later ).
- the public folder is generated by Gatsby while building the application (More on this later).
gatsby-config.jsincludes our site’s metadata and information about all the installed plugins.gatsby-node.jsfile is run once while building the application. It comes with APIs provided by Gatsby which can be used to create pages dynamically, add data into GraphQL, and respond to events during the build lifecycle.
gatsby-config.js:

siteMetadata, property contains information about our site.plugins, is an array of objects that contains all the information about the installed plugins in our application.
We can find all the available Gatsby plugins at this link.
In our application, we need gatsby-source-graphql library for running Graph QL queries on external APIs.
Note: Every Gatsby plugin will have its own options, It can be found on their respective documentation.
We will use https://countries.trevorblades.com graphql API for the country and state details.
gatsby-node.js:

- Here
createPagesis an API and will be automatically called initially, when building the application ( Here is the list of all available APIs ). - actions and graphql are the available parameters.
- graphql is used to query the external API.
Note: In this application, all the graphql queries will be automatically redirected to https://countries.trevorblades.com, which we configured in the gatsby-config.js file.
- First, we query the countries and their respective code.
- Now, with the data, we are looping and creating individual pages for all the available countries.
actions.createPagewill create the pages, it takes in three parameters they are,- path: Url path of the particular file ( In this case we use country code as the path ).
- component: The component provides the content of the page to be created.
- context: This property is used to pass variables to the created page ( We pass the country code in the parameter code ).
Note: Here we are creating a single file statically for every available country, this is way different from a traditional web application. As said earlier, Gatsby is used for creating static websites, So the pages are precompiled and created while building.
index.js:

- This is a react file that lists the available countries.
- Here query variable holds the graphql query for querying the data. The content of this variable will be automatically executed by GatsbyJS.
- The result of this query will be passed as a prop ( “data” prop will contain the results ) to the component. All of these are handled by GatsbyJS.
- Now, with the results, we are displaying the list of available countries on this page.
- The navigate function is used to navigate to another page.
In GatsbyJS the routing is done as follows.
- All the files inside the pages folder will be automatically included for routing by the framework.
- For instance, if the pages folder consists of two pages one.js and two.js then our router for these files will be “/one” and “/two”.
- So, you can access these files with the following URLs respectively.
- http://localhost:<port>/one
- http://localhost:<port>/two
Note: The files inside the pages folder must be a react component.
There are other routing methods available, but those are beyond the scope of this tutorial. You can find more details on routing here.
As we have created individual pages for countries ( country code being the path ), the available routers will be in the format “/<country code>”.
country.template.js:
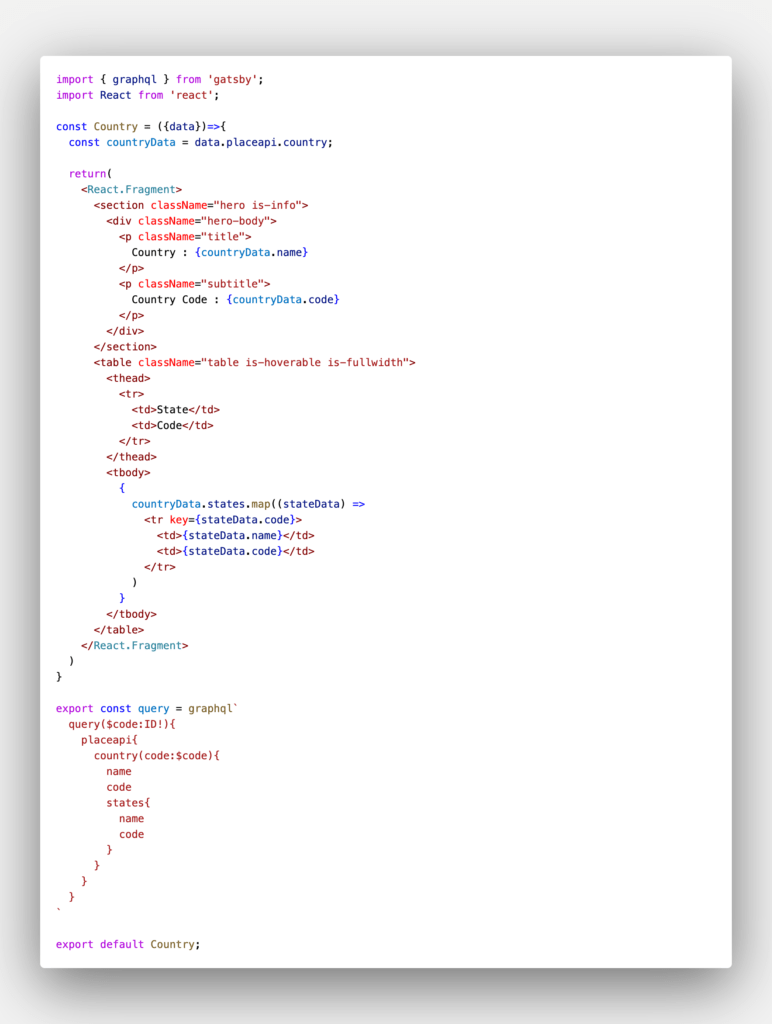
- In this file, we will list all the available states of the selected country.
- This file is the same as the index.js file with a change in the query part.
- Here, the query part contains the parameter “code”($code). This parameter represents the key that we created in the gatsby-node.js file as a context.
The 404.js file comes out of the box, we can change it as per our need.
Running the application:
To run the application, execute the command npm start in the terminal.
After building, you should see that the application is running in port 8000. To change this port number add -p <port number> to gatsby develop command in package.json. example.
")
Now, the public folder should be created in our application. Inside this folder, there is a subfolder named page-data. This folder contains the information of all the pages generated during the build process.
Output:

The above page displays the list of all the available countries. When you click any one of the countries, you will get the following page.

This page lists all the available states of a particular country. Notice the URL, the country code is passed.
Note: The API does lack state list for some of the countries. In this case the above page will be empty.
Misc:
The development server will be automatically restarted if we make any changes. In some cases, you might notice that the page won’t update. This is because GatsbyJS uses caching techniques for better performance.
In these cases, you can clear the cache and restart the server.
npm run clean // For clearing the cacheHappy coding!!!
GitHub repo: https://github.com/kishork2120/gatsby-tutorial
Woah! I’m really digging the template/theme of this blog.
It’s simple, yet effective. A lot of times it’s tough to get that “perfect balance” between superb usability and
appearance. I must say you’ve done a awesome job with this.
In addition, the blog loads very fast for me on Safari.
Exceptional Blog!
Pretty section of content. I just stumbled upon your weblog and in accession capital to assert that I acquire in fact enjoyed account your blog posts. Any way I’ll be subscribing to your augment and even I achievement you access consistently rapidly.